Scarpa SPIN Shoe Review

I have used Scarpa shoes and boots in the past and have always been impressed with the mountain pedigree the brand has. So, I was very welcome to receive the SPIN and the SPIN ULTRA for testing. 

The SPIN, in the words of Scarpa say, ‘… with more cushion and protection than the Atom, but a lighter, lower-profile design than the Neutron, the new Spin is the Goldilocks of our Alpine Running collection, for those who want both support and simplicity on rugged trails and craggy ridge lines.

I will discuss and write about the SPIN ULTRA at a later date.

The SPIN is noticeably light (252g for EU42) and flexible. From the first look one can immediately see that this is a race or fast training shoe designed for a mountain environment. For sure, it’s a trail shoe, but I would extend that to be a mountain/ alpine shoe. It has ‘skyrunning’ written all over it and certainly from initial outings it immediately felt like VK’s and SkyRace (sub 42km) terrain would sit perfectly in the SPIN list of ‘go to’ uses.

The upper is mesh and therefore very breathable, structure and support of the upper comes from welded PU overlay. One of the plus sides of this, as in other shoes using this method, there are no seams that can cause irritation or rubbing inside the shoe.

 The lacing is substantial with 5 sets of eyelets and the additional 6th eyelet should you wish to lace-lock. With a comfortable and padded auto fit tongue which extends slightly higher than other shoes I have tested, this is perfect for stopping any discomfort where the top of one’s foot joins the lower leg. There is a ‘lace-garage’ which is so obviously great, I have never understood why all run shoes do not use this method, or at least something similar.

 The heel is padded and plush and really holds the foot with comfort and security. Very noticeable when running or hiking uphill is the hold the shoe gives; it is very reassuring.

It has a ‘sock-like’ fit (SOCK-FITLW by Scarpa) which is just perfect as it provides a wonderful, secure and comfy hold of the foot.

The toe box is well shaped, allows for toe splay but the SPIN is more of a ‘precision’ shoe designed for technical trail and as such it has a narrower fit but not very narrow. Certainly, if you need or require a wide toe box, the SPIN is unlikely to be for you, but you should try it… It has a toe bumper which provides some protection from contact with rocks or debris.

With a 4mm drop one needs to be a more efficient runner. It’s a shoe with cushioning (24mm/20mm) but not excessively so, hence I see that is a shorter/ mid-distance shoe. The midsole is EVA and I would say is on the firmer side, but after several runs one can feel it soften without compromising the shoe. It has a rock-plate, and this works really well offering great protection via a H-EVA Plate.

 The outsole is Vibram which is known throughout the world. MegaGrip is extremely popular and although aggressive, it is not extremely aggressive. It can handle mud but not really sloppy stuff. Then again, very little shoes can do well at everything. If running in lots of mud, there would be better outsoles than this. But the MegaGrip is perfect for the SPIN intentions – mountains, ridges, trails, rocks in wet or dry conditions. The lugs are 4mm and quite spaced out. Grip is very good on a wide variety of surfaces, but it works best on rock, ridges, loose gravel and soft ground. You will see the the SPIN has cut outs in the sole and here you can clearly see the rock-plate. The cut aways help reduce weight and increase the flexibility of the shoe. This is noticeable, especially in the propulsive phase.

The SPIN comes with two foot beds. One minimalist and the other providing more cushioning and structure. This is a great idea! I personally used the more structured foot bed which secured the rear of my foot more. Switching between the foot bed really changes the feel of the shoe, so, if you prefer something more minimal. You will prefer the thinner of the two.

 Sizing is true to size, I use an EU44 and these fitted as expected.

IN USE

 The SPIN has great comfort and the sock-like fit is just perfect. The lacing system is superb at holding the foot and it is easy to adjust should you need. For example, I have a high instep, so I like to loosen my laces but not at the compromise of a secure foot hold. The addition of the the 6th eyelet allows for different lacing options; I didn’t need to lock lace as the foothold form the SPIN is so good. The lace garage is perfect for getting laces out of the way. One of the revelations is the heel area. It’s plush, extremely comfortable and is arguably the best hold I have had from any shoe. Climbing there is no movement or slipping. 

The upper is very breathable and my feet were comfy in either wet conditions or hot conditions. Drainage is good. The welded overlay is adequate and provides good stability. Toe bumper could be better, but it is a minor complaint.

On technical trail, foot roll is minimal, but the SPIN does have a wasp like (figure of 8) shape and so depending on your foot shape, you could have some roll? I had no roll at all. I got no issues with the SPIN rubbing my ankles, a problem I have had with other shoes on technical terrain, this is a real plus!

Cushioning is on the harder side and lacks life and bounce but that is compensated for with great flex, especially in the propulsive phase. Also, you have two foot bed options and the more padded/ supported option was a real boost for me. They are very comfortable shoes. 

The MegaGrip outsole works really well on a whole mix of terrain, wet or dry. But it works best on soft-ground, rocks and technical trail. Protection is very good but occasionally, you may find a stone getting in one of the gaps in the cutaways of the sole. It will not stay there, but if it is sharper, you may just feel it through the rock-plate.

CONCLUSION 

I have been using Scarpa for many years, the Charmoz a personal favourite. But I have never used a run shoe from the brand. The SPIN has been a revelation and certainly for runs up to 4-hours on technical/ mountainous routes, it’s a shoe I will use time and time again. The overall package is excellent combing lightweight, responsiveness, feel for the ground, cushioning, great comfort and excellent grip in most scenarios. It’s a shoe for faster training or racing in the mountains.  

Highlights come from excellent lacing, the sock-like fit, the shoes weight and the heel box.

There is little not to like in the SPIN. It is more of a precision shoe, but the fit is not as narrow as others, so, you would need to try them on to find out if they would work for you.

The only negative, for me, is the cushioning is a little hard and lacks a little life. It is a minor point and actually does not impair how the shoe performs, however, for some, it may influence how enjoyable the SPIN is to wear. 

Specs: 

  • 4mm drop
  • 252g for EU42
  • Upper Mesh w/ welded PU overlay
  • Insole H-EVA Plate
  • Midsole EVA-CM
  • Outsole Vibram Fixion/ MegaGrip
  • Cushioning 24mm/20mm
  • Sock like fit
  • Lace storage
  • Medium cushioning and protection
  • Choice of insoles

Please support this website. I believe everyone deserves to read quality, independent and factual articles – that’s why this website is open to all. Free press has never been so vital. I hope I can keep providing independent articles with your help. Any contribution, however big or small, is so valuable to help finance regular content. Please support me on Patreon HERE.

Follow on:

Instagram – @iancorlessphotography

Twitter – @talkultra

facebook.com/iancorlessphotography

Web – www.iancorless.com

Web – www.iancorlessphotography.com

Image sales –www.iancorless.photoshelter.com

Skyrunning UK – Lakes Sky Ultra and Scafell Sky Race 2017 Preview

Following on from the V3K, a double bill weekend is ahead as the Scafell Sky Race and the Lakes Sky Ultra will take place. 40km and 2800m of vertical gain and 56km with 4500m respectively make the two races a pure Skyrunning challenge.

Taking place in the iconic Lake District, both races will offer points for the 2017 Skyrunning UK Series which currently has Sarah Ridgway and Oli Johnsson heading up the rankings after success at the V3K.

Sponsored by Salewa and organised by Charlie Sproson and the Mountain Run team, the two races are a highlight not in the 2017 Skyrunning UK calendar but the UK race calendar.

The Scafell Sky Race will take place on July 16th and offers a tough challenge for a novice or experienced Skyrunner with a fully marked course, 9 manned checkpoints and GPS tracking. By contrast, the main event of the weekend, the Lakes Sky Ultra will take place on July 15th. The LSU is a tough challenge with exposed sections, technical scrambling and quad busting 4500m of vertical gain – this race is not for novices and a strict vetting procedure is in place to ensure that those who take on the challenge are well placed to finish. Like the Scafell race it has a fully marked course, 13 manned checkpoints and GPS tracking.

In the words of the race director, Elevated ridgelines, breathtaking exposure, fast travel on technical mountain terrain. Definitive Lakeland vistas. Classic Lakeland scrambling. Fell running on additives. This is Skyrunning™. This is the Lakes Sky Running™ Weekend.

Both races will prove to be exciting and we can expect the LSU to see a potential male and female winner coming from the following:

Men:

Bjorn Verduijn was the Skyrunning UK champion in 2016 and therefore heads up the field as a hot favourite, he recently toed the line at the Dragons Back Race but complained that he had a lack of fitness – a question mark hangs over him for LSU.

Andrew Berry set the second fastest winter Bob Graham Round in January this year so we know he can handle the terrain and challenge.

Tommaso Migiuolo recently placed 5th at the V3K gaining valuable points for the overall ranking. A top placing at LSU may well see him top the leader board as we move into September and the Glencoe races.

Mark Davies placed 15th at LSU last-year so he has course knowledge. Importantly, he recently placed 10th at the tough and challenging Dragons Back Race.

Jean Tournaire will also be a potential for the top-5.

Women: 

Zoe Salt has raced LSU previously so knows the course and has recently had a good return to form placing highly at Transvulcania Ultramarathon – she is a great potential for the podium.


Jacqueline Toal may well be the lady to push Zoe all the way to the line, she is a key figure in mountain running in Ireland.

Sarah Harley recently won the V3K half distance race which didn’t qualify in the Skyrunning UK calendar but it does show some great form – the LSU is a huge step up though in course severity and distance.

Cat Slater placed 4th in recent Keswick Mountain Festival 25km Trail Race, like Sarah though, the LSU is quite a step up.

With 141 entries in total, the LSU will be an exciting race and the ladies field is proportionately large with 24 entries. With so many unknown it will be a good race to watch.

Countries represented are Poland, Holland, Ireland, France, America, Romania, South Africa, Italy, New Zealand and Sweden.

****

The Scafell Sky Race has 83 entries and it is fair to say that the head and shoulders favourite is Australia’s Lucy Bartholomew. Lucy is one of the most talented female runners in the world and is very much a protégé of Emelie Forsberg. She has set many records and recorded many victories in the Southern Hemisphere and most recently she arguably had her biggest success making the podium at Mont-Blanc 80km. Read more HERE.

Ben Hukins may well be the first across the line, he was a main contender in the Skyrunning UK calendar last year and it’s interesting to see him drop down from the LSU to the Scaffell Race – maybe a tactical move for points?

Also keep an eye on Jo Kilkenny, Paul Barton and Gavin Sandford.

You can obtain more information from the race website HERE and don’t forget to follow @lakesskyultra on Twitter and go to the LSU Facebook page HERE.

Marmot Dark Mountains 2015

©iancorless.com_IMG_5450Marmot24_2014_

The organisers of the formidable Marmot Dark Mountains™ have just announced that the 2015 event will take place in the Howgills on the night of 24th & 25th January 2015.
Marmot Dark Mountains™ takes the classic two-day mountain marathon format and gives it a new… darker twist. Rather than two days of running with an overnight camp in between, Marmot Dark Mountains™ packs everything into one winter’s night!
©iancorless.com.©iancorless.com.P1100372
The event kicks-off on the Saturday evening with the longest classes setting off first for dusk-to-dawn racing. The shorter classes set off later in the evening with the aim of most competitors finishing within an hour or so of each other the following Sunday morning. This makes for an exciting finale as all the courses and most of the competitors converge on the finish as dawn breaks.
©iancorless.com.©iancorless.com.P1100383
Race Director, Shane Ohly from Ourea Events describes the 2015 event area, “The Howgills provide a superb setting for Marmot Dark Mountains™. The terrain is definitely more runable than previous editions of the race but with the steep sided valleys that are typical, there is significant height gain, and the course are sure to provide a suitable test of endurance.” He continued, “The Howgills also seem to catch more than their fair share of winter weather and we are anticipating a tough challenge for those competitors brave enough to enter.”
©iancorless.com.©iancorless.com.P1100464Marmot Dark Mountains™ has a growing reputation as the test of competence for experienced mountain runners. Ordinarily a standard mountain marathon with its combination of mountain running and navigation at its heart is a sufficient challenge but Marmot Dark Mountains™ takes it a step further by packing two days of running into one long winters night with dusk-to-dawn racing.
Marmot Dark Mountains™ 2013 was held in the southwest fells of the Lake District National Park. That year the event experience extremely poor weather and the completion rate for the linear courses averaged just 21%. In 2014 the event moved to the Peak District National Park and with better weather the completion rate rose to 53%. Still, these are low completion rates considering that competitors are vetted for experience before their entry is accepted.
With the announcement of the venue, the organisers have also released details of the routes, which have been planned by Charlie Sproson who is a regular Race Planner for Ourea Events. These are:
  • Elite Course: 53.1km / 2,966m
  • A Course: 42.3km / 2,415m
  • B Course: 35.8km / 2,311m
  • C Course: 33.9km / 1,770m
  • Long Score: 10 Hours
  • Short Score: 8 hours
Working in collaboration with Harvey Maps at the 2014 Marmot Dark Mountains™ bespoke ‘high contrast’ maps were produced for the first time. These were designed to show contours more clearly in the dark and when the map is illuminated by high-powered headtorches. These were a great success and the 2015 event will also feature these special night maps.
Ourea_Events_Logo(600)
Race Director, Shane Ohly elaborated, “For an event that is focused on mountain navigation and running, we understand completely that the quality of the map is directly linked to the quality of the overall experience and as such, we invest significant time and energy into the map. As in previous years we will be using waterproof and tearproof paper and our special night-nav high contrast printing developed with Harvey Maps. Whilst checking control sites both Charlie Sproson and I have been recording new paths, fences etc with GPS and combined with Harvey’s updating their base data from a new photogrammetry survey data, we are confident that we will provide a high quality and accurate map for the competitors.”
With the support of sponsorship from Marmot® and Petzl® there is a £500 cash prize for the winning elite team. In 2014 Steve Birkinshaw and Tom Gibbs won and Alex Pilkington and Kim Collison won in 2013.
Key Event Information
Website: www.Marmot-Dark-Mountains.com
Date: 24th & 25th January 2015
Venue: Howgills, Northern England
Entry: from £50 per person
Courses: Elite, A, B, C, Short and Long Score

Marmot Dark Mountain - FINAL (BLACK)

marmot_logo

ortlieb-logo(290x290)

Navigation 101: Intermediate Navigation – Beyond the Basics by Mountain Run

Mountain Run

This is a second article in a trio of interviews with Ian Corless, about Navigation for Ultra Runners & more. Read article one HERE

all content ©mountainrun

In the first interview we covered the Basics of Navigation, this encompassed maps, compasses, setting your map & how to set a bearing.

The second interview was moving into intermediate navigation & it consisted of the following information & techniques:

  1. Declination/Magnetic Variation
  2. Grid Numbers/Plotting a Grid Reference
  3. Back Bearings
  4. Re-Orienting/Re-locating
  5. Thumbing the Map
  6. Hand-railing
  7. Catching Features
  8. Aiming Off

So lets start with:

1) Magnetic Declination or Magnetic Variation: 

There are 3 points at which north is seen. 1) True North, 2) Grid North & 3) Magnetic North. We are concerned with Grid North & Magnetic North.

Grid North is what is detailed on a map, its where the North/South grid lines show us the direction of north, according to the grid lines printed on the map. This is almost the same as True North, so we will group True North & Grid North the same. These are fixed points & do not move.

Magnetic North is what your compass needle points towards, being magnetised & this is not a fixed point, it moves over time. Magnetic North is explained as so:

“The North Magnetic Pole is the point on the surface of Earth‘s Northern Hemisphere at which the planet’s magnetic field points vertically downwards (in other words, if a magnetic compass needle is allowed to rotate about a horizontal axis, it will point straight down). There is only one location where this occurs, near (but distinct from) the Geographic North Pole and the Geomagnetic North Pole.

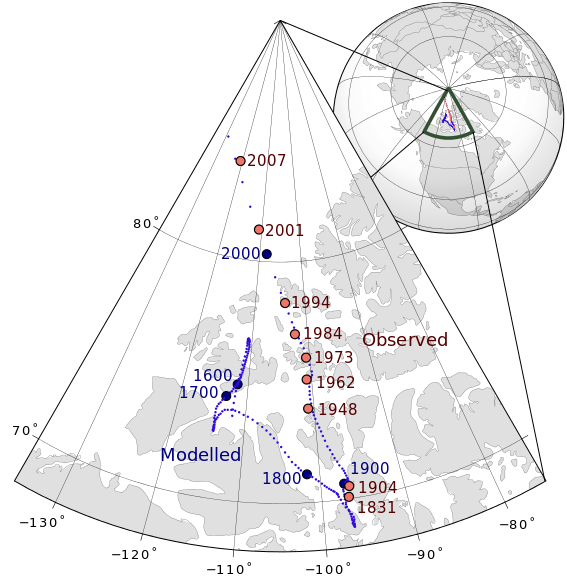
The North Magnetic Pole moves over time due to magnetic changes in the Earth’s core.[1] In 2001, it was determined by the Geological Survey of Canada to lie near Ellesmere Island in northern Canada at 81.3°N 110.8°W. It was situated at 83.1°N 117.8°W in 2005. In 2009, while still situated within the Canadian Arctic territorial claim at 84.9°N 131.0°W,[2] it was moving toward Russia at between 34 and 37 miles (55 and 60 km) per year.[3] As of 2012, the pole is projected to have moved beyond the Canadian Arctic territorial claim to 85.9°N 147.0°W.[2]

Because we have a variance between True North & Magnetic North, we therefore need to use something called the Magnetic Variation. This is described as follows: 

“Magnetic declination or variation is the angle on the horizontal plane between magnetic north (the direction the north end of a compass needle points, corresponding to the direction of the Earth’s magnetic field lines) and true north (the direction along a meridian towards the geographic North Pole). This angle varies depending on position on the Earth’s surface, and changes over time.”

It is also explained more formally, Bowditch defines variation as “the angle between the magnetic and geographic meridians at any place, expressed in degrees and minutes east or west to indicate the direction of magnetic north from true north. The angle between magnetic and grid meridians is called grid magnetic angle, grid variation.

Magnetic_North_Pole_Positions

Depending on which country you reside in will then depend on what the Magnetic Variation actually is. For example, if you live in the UK then the Magnetic North is 1.5 degree’s at the start of 2014 west of True North. The reason it is west is that we sit to the east of the Agonic Line or line of Zero Declination where Mag North & True North are the same. There are several points where this occurs around the world. Its a bit technical, but all you need to remember is that the Mag Variation is printed on all maps in the UK to advise what the Mag Variation is at what ever year the map was printed.

IGRF_2000_magnetic_declination

In order to correct your bearing to take into account the Mag Variation, you must adjust the compass 1.5 degrees east of the bearing you have taken, or more easily remembered, add 1.5 degrees on to your compass bearing you have just taken from the map. To make life even more confusing, the Mag Variation in 2015 is 0, therefore Mag Variation need not be corrected for that year, so it is almost not worth making this correction for the next year & certainly if your navigation is broken down into small legs. It really only comes into play right now, if you are travelling over large expanses of land, without any catching features, hand rails etc.

Transversely, if you are using the Mag Variation, remember when making a sighted bearing, whilst relocations, you might want to subtract 1.5 degree’s off your bearing in order to get an accurate bearing when you place the compass on the map. It all depends how accurate you need the bearing to be? Are you looking at a mountain summit? If so, is your bearing really that accurate anyway.

So Mag Variation in the UK is not really necessary right now.

If you are in Europe or other parts of the world like the US, then your Mag Declination/Variation will be different. It should be on the map you are using, if not consult a website like Wiki for more information.

North & South of the Equator. 

If you buy your compass in the northern hemisphere, then it is not set to work in the southern hemisphere & visa versa. Silva produce 3 types of compasses to work in 3 different magnetic zones. The best piece of advise is if you are traveling, then buy a compass for use in the zone which you are traveling. Best to contact a company like Silva to get the right compass.

Can I set the declination on a compass, so I can forget about the Mag Variation? 

Yes is the answer, but they don’t come at a small price. Most compasses, of reasonable value, like Silva 2NL-360 Explorer will have a Declination Scale on the bevel base plate, this can be used for quick adjustment. If you want to set the mag declination, then you need to purchase a compass capable of doing this, like the Silva 15T-360/6400 Green military compass. Its not really necessary for general use, especially in the UK right now.

Ok, so the confusing Mag Declination/Variation is done. Use at will, just remember to check on the country you are in as to what the variation is & apply it if necessary. Its list on the map you have in your hand, or at least the one you will be using.

2) Grid Numbers & Plotting a Grid Reference

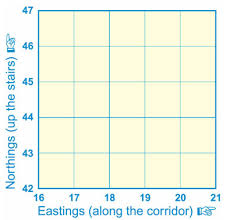
Grid numbers are applied to the grid lines. These are a squared matrix applied to the whole country to divide it into different sections. They are laid out to make squares 100k by 100k, these squares are then broken down to have a further matrix applied giving squares of 1km by 1km. These are the lines/squares printed on your map. The lines running from east to west are numbered from south to north, these are the ‘northings’, the lines running from north to south are numbers west to east, these are called the ‘eastings’. A grid reference is made up of these printed numbers.

northings-eastings

So on the image pictured to the left, we have Eastings along the bottom & Northings running up the side. In order to find a certain grid we need 4 of these numbers. This a 4 figure GR.

We are always given the Eastings first & the Northings second.  A 4 figure GR would read as 17 45

Once we understand this we can move to a 6 figure GR. This is done by breaking down each of the squares into a further 10 divisions on either scale, making 100 squares inside the existing square and will allow us to pin point a location to within a 100m square on the ground. A 6 figure GR would be something like 175 454.

This can be taken into a further pin point of 10m squares by using the same logic & so on.

A roamer on your compass can be of great help here to pin point 6 figure GR’s.

Not following? Book on a course….

3) Back Bearings. 

Very useful in either re-locating yourself or using a feature to make sure you are looking at what you think your looking at. A back bearing is taken by using a sighting of an identifiable feature, be it a path, summit, building or  large reentrant & applying it to the map. This can help you do one of 2 things. 1 – re-locate yourself on a line feature (its hard to relocate with this technique exactly, but it can help your judgement or give you a rough location) or 2 – help you to make sure the feature you are looking at is the same one you are looking at on the map.

Remember that when taking a back bearing, you might need to subtract the Mag Variation to make sure its correct. 

compassatpeak

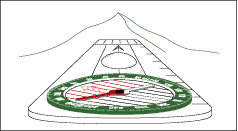
To take a back bearing, line the direction of travel arrow at the front of your compass with the feature, make it as exact as possible. Then swivel the rotating bevel so that you line the red end of the needle in the red house/shed, remember the Red in Shed. This is now your bearing set. Next put the compass on the map & line the front side up with the feature you think you are looking at, and move the compass until your orienting lines on the base plate match with the N/S Grid Lines on the map. You should now be able to locate yourself somewhere along the side of the compass.

A back bearing works best if you are already located on a line feature, as this bearing will then cross the line feature at some point, giving you a rough location of where you are on that line feature.

4) Re-Orienting/Re-Locating.

A very necessary skill, used to either make sure you are where you think you are, or as it sounds, to actually re-locate. Once you are adept at this skill, it should be used throughout the day, as you progress through your race or just through the mountains to keep a check on your position, but of course if you are thumbing the map, then it will be a whole lot quicker & easier. When you’re really good at it you will re-locate whilst on the move.

Clients on a recent OMM Mountain Skills Day relocating on Place Fell, Eastern Lakes

©iancorless.com.IMG_5128GL3D_Day1

How to do it: 

Use everything at your disposal. This means look for all the identifiable features you can see, summits, paths, streams, woods, walls, buildings, ruins, sheepfolds etc. Orientate your map, if it is not already! Now match the features on your map to the ground, or visa versa. If your still not sure, then use a back bearing by locating a summit or other feature & take a bearing from it by following what was discussed above.

If you are not on a line feature you will then need to start really assessing the contours & because you have studied your contours well at home, you have a good handle on how to interpret what you are looking at to the features/contours on the ground. Are you in a reentrant, or is there one close by. Is the valley in the right place in front of you in relation to the map.

Re-Location requires lots of practice, the more you do, the better you will get until you can re-orientate whilst on the move.

5) Thumbing the map. 

Thumbing the map with compass in hand.

©iancorless.com_IMG_5329Marmot24_2014_

A very simple, but very useful technique. Once you start to get a handle on navigation, map reading & compass work you will be able to fold your map smaller, so not needing so much of it in view. The smaller you can have your map folded, the easier it is to thumb the map. By doing this we mean, fold your map in half, half again and so on until you have a manageable size to hold in your hand. Obviously make sure you can see the area you are in. Now, knowing where you are on the map, put your thumb over this location. Having the map oriented correctly in your hand is very important. As you walk/run along your chosen courses/bearing, you simply move you thumb small increments to keep up to date with your progress.

Why is this useful? 

Because you need to be able to locate your rough position on the map at a split second or whilst on the move. When you want to check your surroundings against the map, just pull it up to have a look & your thumb will be placed near to where you are, you can then re-locate very quickly & keep a track of your progress from map to land or the other way round. This is how you will learn to re-locate whilst on the move!

6) Hand-railing. 

It is as it sounds, using a handrail to help you on your way as you travel across the land. So what is a handrail? It a feature on the map that allows you to use it as a hand-rail. It is always a line feature & can be as simple as a path, or as obscure as a blind ridge line (by blind I mean rounded & not obvious). Once you have established the handrail is going in the direction of travel you want you can walk/run along it until you need to make your next decision.

Examples of Hand Rails

Handrails

How do you know when to stop? Use the next technique, a catching feature….

7) Catching Features. 

A catching feature again is as it sounds, its a feature that catches you. It can be designed to wake the brain up to say your nearly at your destination, next direction change or just as a marker to what is coming next. You can have as many catching features as you like along your chosen course. Don’t pick too many though, as it will be hard to remember. Try to limit them as wake up calls, or direction changes, but you can still use them as markers to track your progress.

Plenty of Catching Features in the image below: 

Catching-Features_edited-2

A catching feature might be a wall corner, building, junction in a path or river or a crag that you are moving past. Used in conjunction with thumbing the map & hard rails, you can see that you can really track your progress as you move forwards.

8) Aiming Off. 

The last technique in our intermediate navigational skill set. We use aiming off to catch a line feature, that we may then use as our next bearing setter or as a handrail until we reach the next catching feature.

To aim off we use a bearing slightly off to the side of the line feature we are heading for. This can be either left or right, but it need to be obvious, otherwise you might miss it.

Aiming Of below so you don’t miss the control, best practice in foul weather!

Aiming-Off_edited_edited-1

Lets say your travelling across open ground south to north, there is a tarn in front of you running from west to east & you want to catch this feature, but keep moving past it. The weather is in and visibility isn’t what you want it to be. You want to pass the tarn to the east, so you need it to be on the western side of you. How will you know you have passed it, if you can’t see so well due to mist? The tarn might be 500 m long, west to east. By aiming off, rather than passing the tarn on a bearing and checking it off as you go, you are better aiming off your bearing slightly to the west & hitting the tarn, this then gives you an identifiable feature to break up your leg & confirm you are where you think you are. You can then take your next bearing to the location you want to reach, using the techniques of handrails, catching features & possibly aiming off again.

Get these skills dialled in good weather & you can now be ready to head out in to the open fell in inclement weather. Get them dialled in bad weather & your getting ready to head out at night.

Still not got it? 

Are you interested in an UltraTrail Nav Day or a Mountain Marathon Skills Day?

Send us your details here: