Episode 190 – We talk with Brittany Peterson and Cody Lind about setting multiple FKT record on the 310-mile Superior Hiking Trail in the USA.
*****
Talk Ultra is now on Tunein – just another way to make the show available for those who prefer not to use iTunes – HERE You can download the Tunein APP HERE
Talk Ultra needs your help!
We have set up a Patreon page and we are offering some great benefits for Patrons… you can even join us on the show! This is the easiest way to support Talk Ultra and help us continue to create!
Many thanks to our Patrons who have helped via PATREON
Coree Woltering new FKT on Ice Age Trail 1200-mile here
Joe “Stringbean” McConaughy Long Trail Vermont unsupported 4d 23h 54m here
Brittany Peterson and Cody Lind “4 days, 9 hours, 27 minutes, and 18 seconds. We did it!! The new men’s and women’s overall FKT on the Superior Hiking Trail”
*****
INTERVIEW : BRITTANY PETERSON AND CODY LIND
*****
Please listen to the INTERVIEWS – please follow the show
Hosted on ANCHOR (HERE) the INTERVIEWS will also be available to listen on many other players, including SPOTIFY (HERE).
TALK ULTRA podcast will be released as normal providing you long shows as it has always done with ideally two shows per month. The back catalogue will be released randomly via the INTERVIEWS and not chronologically.
Importantly, go to iTunes and subscribe so that you automatically get our show when it’s released we are also available on Stitcher for iOS, Android and Web Player and now Tunein. We are also on Spotify too.
Our web page at www.iancorless.com has all our links and back catalogue.
Please support Talk Ultra by becoming a Patron at www.patreon.com/talkultra and THANKS to all our Patrons who support us. Rand Haley and Simon Darmody get a mention on the show here for ‘Becoming 100k Runners’ with a high-tier Patronage.
Norway has long been a desirable location for the mountain enthusiast. One only need to add the word ‘Norway’ to a Google search engine, and you will be rewarded with photos that make the jaw drop.
At roughly 33% bigger than the UK and 1/3rd the size of USA, one begins to understand the scale of this Scandinavian country and its 5.3 million inhabitants.
Just think about it, Norway is 33% bigger than the UK, but the UK has 66.6 million inhabitants…
Needless to say, outside of Oslo (681,000 pop), Bergen (271,000 pop) and other key locations such as Trondheim and Stavanger, open space and amazing landscape is available for all to explore.
In a series of articles and posts, we intend to introduce you to the magic of Norway.
Norway is the longest country in Europe and therefore, travelling anywhere is not a quick process. It has 60.000 miles of coastline, towering mountains and dramatic fjords. Remarkably it has 2-300 peaks over 2000m+, Galdhøpiggen the highest at 2469m closely followed by Glittertind at 2464m. There are over 1000 peaks over 1650m, so, if you love mountains, Norway should be at the top of the ‘to-do’ list!
We are starting our articles with HARDANGER which is easily accessible from Oslo or Bergen and although based in the south of Norway, it does not lack any of the drama or mind-blowing views that northern Norway offers in abundance.
The list will grow as we progress through Norway, but expect posts on:
Stavanger
Loen
Jotunheimen
Senja
Tromso
Lofoten Islands
Romsdal
Lyngen
Svalbard
And more…
HARDANGER
The fjord (Hardangerfjord) resort of Kinsarvik will be used as an initial start point for adventures in the Hardanger area, by car, it is 2hrs 30min from Bergen and 5hrs from Oslo.
Located in the west of Norway, Hardanger is a traditional district with a great deal to offer in both summer and winter. For the purposes of this initial introduction, we are looking at a 4-5-day trip in June.
June provides a wonderful opportunity as the area transitions from winter to summer, if lucky, much of winter can remain and therefore you can gain the best of both worlds. It’s worth pointing out now, that winter conditions in Norway are harsh and you need to be prepared both physically, mentally and have the correct equipment to explore safely in this area. If any of the above have a question mark, look to travel and explore in July/ August when snow conditions will have disappeared.
Areas to explore:
Dronningstien aka The Queens Trail
Trolltunga
Folgefonna Glacier via Buerbreen
The waterfall route via Husedalen Valley
Climb Oksen
Other opportunities:
Kayak in one of the longest fjords in the world.
Via ferrata to Trolltunga.
Ice climb on the Folgefonna Glacier.
PRACTICALITIES
Norway is not a cheap place and therefore one needs to look at budget when exploring any area of the country. Flights, depending on the time of year will vary in price and car hire can be expensive. However, in many scenarios, a hire car allows one freedom to explore. Train services and public transport is good. We recommend a car to explore Hardanger.
Camping is part of the outdoor life and there is nowhere better than Norway to sleep outside. Norway allows for wild camping, however, be careful, some areas, particularly Trolltunga have a camping exclusion zone.
For the purposes of this mini trip, we used an official campsite and wild camped. Below I provide a map to show an overview of the routes and areas we explored.
Our itinerary was as follows:
Day 1 – Travel and overnight stop.
Day 2 – Dronningstien aka The Queen Trail
Day 3 – AM: Trolltunga – PM: Buerbreen Glacier
Day 4 – Waterfall route via Husedalen Valley
Day 5 – Oksen and travel home.
All of the above trails are not long and are all achievable in one day or less.
The Queen Trail is a longer route (20km) with mixed terrain on a point-to-point route.
Trolltunga is exposed and with snow (time of year dependent) – a more extreme challenge, particularly if one has limited snow experience.
Buerbreen Glacier is a short route but has plenty of vertical and technical terrain, expect fixed ropes, some snow and water crossing.
Husedalen Valley, the waterfall route is a great out and back with stunning views and at times, some testing terrain. Your feet will get wet!
Oksen is a straight up climb (1000m+) with some exposure, challenging terrain and the potential for snow/ glacier travel depending on the time of the year. It’s an out and back route.
Day 1 base was Kinsarvik. There is an official campsite, Kinsarvik Camping AS (here) which has cabins, space for motorhomes and tents. You are recommended to book any camping, especially in high season. Alternatively, you could wild camp close to Kinsarvik.
There is a Spar supermarket opposite the fjord, and this sells everything, including camping supplies. So, this is a great opportunity to stock up on any anything that you may require.
Our day 2 and day 3 base was an official campsite in Odda, called Odda Camping (here). This area due to its proximity to Trolltunga has potentially less options for wild camping, however, some options exist in Buer close by. It was a perfect location with a fjord as a backdrop, showers (20 Nok charge) and toilet facilities. At 250 krona per night (£20) it was a great option. Odda has a developed town with plenty of facilities, so, should you need anything, it will be available in the town.
Day 4 we wild camped below Oksen. There is nothing close by, so, be prepared with food etc.
Day 5 we wild camped on the way back to Oslo.
THE ROUTES
Dronningstien aka The Queens Trail
The trail is a point-to-point route between Kinsarvik and Lofthus. We recommend parking opposite the ESSO Petrol Station next to the fjord, parking is free.
The actual trail starts at Røte which is 4km up a road from route 13, very close to the ESSO petrol station. However, we recommend doing this on foot. Location is shown on the map below.
For the first 4km you will have no marking and then at Røte you will see blue a ‘D’ or blue spots. This is the route to follow.
The official route is 16km and is estimated to take 8-9 hours and is described as ‘long and demanding!’ For perspective, we did the route with an additional 4km, we had a great deal of snow and we constantly stopped for photos. Yes, we did run, and we completed in 4hrs 50min. We did not push the pace or go fast.
Recommendations are for July to September but in June you have the chance of snow, 2020 had a great deal of snow, far more than normal. For us, this was a real plus!
The early km’s are all climbing and uninspiring but there are some wonderful views. Once the ‘D’ starts, the route becomes trail and you continue to climb eventually breaking out of the tree line. The immediate views over Hardangerfjord are quite amazing and breath tanking. It did not take long to realise why this was a favourite route of HM Queen Sonja, hence, The Queen’s Trail name.
Once high, the terrain has some undulations, but it is mostly flat with all the climbing coming in the early km’s. You will see from the run route below that we had snow for all the high sections and some snow on the descent to Lofthus. We had amazing weather, blue skies and plenty of heat. You really need to be careful of snow bridges, snow holes and potential danger and hazards. Best practice is to follow existing footsteps and pay attention to markers. Some ‘D’ or blue markers will be missing because of the snow but navigation is not a problem.
At all points, the Hardangerfjord is to your right and the views are stunning. On occasion you are brought to the edge of the plateau. Take time to stop, look over and soak up how incredible the vistas are.
You will find breathtaking views of the Sørfjord, Odda, the Folgefonna Glacier, Hardanger Bridge and Eidfjord. You can also see all the way over to Kvanndal and Utne, and along the fjord to Kinsarvik.
Water is available at several points via streams, waterfalls or melting snow. Take the opportunity to replenish bottles.
Before the highpoint of the route, there is a little climbing with some fixed rope, it’s nothing too scary or dramatic. Just use caution.
The high point is a square pile of stones (cairn) at 1107m which has a box on so that you can sign the book inside to confirm you were there.
From here, it is mostly descending all the way back to Lofthus. You will eventually switch from blue ‘D’ or dots to red ‘T.’ The descent is steep, winding, may have snow and includes the ‘Monk Steps.’ Open expansive trail eventually becomes tree covered.
Keep descending down. You will pass through a car park for those who wish to climb up from Lofthus. Keep descending and you will pass the famous orchards of this area, you will finally join the main road next to the fjord. The route is done!
A public bus back to Kinsarvik leaves from opposite Hotel Ullensvang. Please check on timings, but our information was 1551, 1810 and 2100hrs. There is a cafe/ shop called Kompaen that serves food and drinks should you need to replenish after a hard day on the trails before heading back. Make sure you taste some local apple juice or cider.
At Kinsarvik, we had a picnic by the fjord and then headed to Odda and Odda Camping. This would allow us an early start the following day for Trolltunga.
Trolltunga
The Trolltunga (Trolls Tongue) is an iconic route in Norway. Formed about 10,000 years ago by glacier erosion it is considered one of the most spectacular cliffs in Norway. From the side, it quite literally looks like a tongue balancing 700m above the Ringedalsvatnet lake.
Considered as a ‘demanding’ route, the out-and-back can be estimated to take 8-12 hours and the typical season is June to September. Outside of this timing one must have a guide. This year, 2020, Norway has had a great deal of snow and unusually, this year’s route was pretty much 90% snow and we had strict instructions to adhere to the marked route.
Despite conditions, we found the route very runnable and the snow was perfect. We did the out-and-back in 4-hours, just under 5-hours with all the photo stops. And trust me, photo stops are compulsory!
For most, particularly with snow, this is a challenging route, mainly due to the 20km+ distance, elevation gain and at times, demanding terrain.
It is a very, very popular route and therefore is often extremely busy. However, Coronavirus greatly has impacted on tourists and visitors in 2020 and the normal busy trails were quiet.
There are three car parks with limited space, 30 cars at P3, 180 at P2 and 220 at P1, book in advance (here) and if possible stay at car park 3 (Mågelitopp.) This is closest to the trail head and costs 600 Nok (£50). Car park 2 is 500 Nok. Car parks open 0600 hrs. There are also shuttle buses from Odda/ Tyssedal to Skjeggedal and then Skjeggedal to Mågelitopp with a cost of appx 450 Nok. You may think these costs pricey, however, the money is used by the local community to cover the impact of tourism in the area.
Importantly, this is a high mountain route with highly changeable conditions. Go prepared with extra warm layers, gloves, hat, waterproofs, food and water. You can replenish water en-route from streams and waterfalls.
It is possible to start from Skjeggedal which adds 4.3km up and down to the route hiking (or you can get the shuttle) but we decided to miss this as we were adding the Glacier route to our afternoon.
Start early, if running, you have the potential to arrive at Trolltunga first and have great opportunities for photos. It has been known at busy periods to wait over an hour to get on the tongue for the ‘iconic’ photo. We actually started at 0800 and caught all the hikers ahead of us. We actually had at least 40-minutes at the tongue for photos and picnic before the next people arrived.
Skjeggedal to Mågelitopp is a steep tough climb and well-marked. From Mågelitopp, the start of the Trolltunga route is just below the car park, the route is clearly marked and relatively flat. It’s marshy to start with interspersed rocks. We had snow in these early sections, so, we were well aware that the whole route would be snow bound.
The first few km’s are arguably the toughest with 800m of vertical.
After the initial hard work, the trail rolls along, the snow conditions making our trip perfect. At all times, the views to your right are stunning with mountain vistas and the stunning Ringedalsvatnet lake.
For safety, there is a mountain outpost and two emergency huts/ shelters should you have a problem.
There is a twin waterfall, Tyssestrengene and Tyssehylen Lake to pass before arriving at Trolltunga.
The approach to Trolltunga is perfectly safe and not technical for an experienced outdoor person. However, if new to hiking and extreme environments, take a little time, move slowly and make sure of foot and hand holds. Hopefully, you may not have to wait for an opportunity to walk out on the tongue for your photo moment.
The return route is a reverse of the outward route.
Without snow, the route would be very different and in a personal opinion, less beautiful and dramatic. The snow added a real extra element to the journey, so, I would recommend attempting Trolltunga as early in June as possible.
Once back at the P3 car park we returned to our campsite for a relaxing lunch.
Buerbreen Glacier
The reason we chose P3 for Trolltunga was to allow us to do the out-and-back route to the Buerbreen Glacier which is a short drive from Odda.
The route is less than 6km and has appx 450m of vertical gain, but the route has a great mix of some technical terrain, fixed rope, water crossings and snow if you are lucky.
Leaving Odda, you head to Buer and continue up the road to eventually arrive at a car park. Cost is 150 Nok.
A gravel road starts the route from a farm. There is a plethora of animals around to entertain.
Entering the forest, the trail winds upwards continually with very little flat trail. Expect wet feet and the need to use ropes to ascend rock sections. If conditions are wet, take care.
Keep looking back as the views are wonderful, countered by the dominant glacier ahead. The route up does have some challenges with fixed ropes.
Eventually the trail stops with the glacier ahead. Do not be tempted to veer off the route and explore on the glacier. Needless to say, this requires a different skill level, specialist equipment and knowledge of the glacier and its conditions.
The panorama and views at the glacier are magical.
You return via the way you came.
At under 6km, it’s a great addition to the more adventurous morning at Trolltunga. Don’t underestimate this little hike. It’s a wonderful trail and the views are magical.
We returned to Odda Campsite for a relaxing evening.
Husedalen Valley
This route was not on our original plan; however, we were advised by locals that Husedalen Valley in June is incredible due to the melting snow and the succession of waterfalls.
Leaving Kinsarvik head up Husavegen Road and continue until you arrive at a parking area on the left.
The route is 12km +/- out and back with 630m+. The initial km’s are gravel road, first waterfall is called Tveitafossen.
The gravel road forks, take the right trail. You climb steeply next to a pipeline before entering forest trail.
The second waterfall is already visible, Nyastølfossen.
The views are incredible and the noise of the waterfall impressive. The trail rises steeply at times with some demanding trail. Nyastølfossen is hidden, peeping through the trees and then suddenly you get full views. Take time to stop, watch and take photos.
The third waterfall, Nykkjesøyfossen is located in a beautiful meadow. This is a popular wild camping spot with incredible views, so, keep this in mind. There is a small hut and also a public toilet here. The trail is easy to lose here but keep close to the water edge (on your right) and follow climbing and scrambling over the rocks. Eventually you will see the trail rise up.
The trail goes up again through trees and heads towards the 4th and final waterfall, Søtefossen. At times it’s easy to lose the route but in all honesty, you cannot get lost, just head for the waterfall. Eventually you can go no further as the 4th raging torrent forces you to sit down and watch its beauty.
You return via the same route.
This route is often listed as demanding, as always, this depends on experience and fitness. Estimated to take 5-6 hours we did the route in 3h 25m with continuous photo stops.
On returning to the car, we returned to the fjord at Kinsarvik for a lunch break and then we travelled over to Oksen to wild camp.
Oksen
The drive to Oksen takes you over the impressive Hardanger Bridge (toll payable 150 Nok) which is the longest suspension bridge in Norway at 1380m long.
Please note, once you have left Kinsarvik (or any other town for that matter) you will not pass any shops or supplies on the route to Oksen. It’s a narrow out-and-back road that passes close to the fjord and remote houses. Eventually you will drive up heading to ‘Tjoflot’ – continue along the winding road and eventually you will come to a dead end where parking is available. A fee is payable for parking.
Our suggestion is to arrive late afternoon or early evening and wild camp close to the car park or, start the climb of Oksen and after approximately 1-mile you will find a plateau with two huts, here is a good place to camp.
With either of the above options, you can start the climb of Oksen early the following morning ahead of other people arriving. We decided to camp near the car park as we wanted to do the whole climb in one go.
This route is very different to the previous day’s expeditions. It feels much more remote, exposed and has many similarities to a classic VK (vertical kilometer) route. You will climb just over 1000m+ in less than 5km to reach the summit.
We had dry weather but cloud and strong winds. Like the rest of the Hardanger area, once above a certain height, we had snow all the way to the summit making the journey extra special.
The early climbing is through forest as the trail winds up. Once you reach the plateau where the two huts are, the trail is now open and wide. The route is well marked but be careful in snow sections, at times it’s better to deviate on to firm/ harder ground.
The whole route is steep and especially so between 400-600m+ and after 800M+ with the route flattening out towards the summit.
At all times the views are incredible and arguably the views of Hardangerfjord, Sørfjorden, Granvinsfjorden, Eidfjorden and Samlafjorden are the best in the region.
The summit is marked with a stone cairn signifying the altitude of 1241m.
Take time to explore the summit and look at the different views. There is a stunning vista of the suspension bridge too.
At the summit you have options to extend your route. This was our original plan; however, snow and weather conditions were very unpredictable, and we decided (correctly) not to take risks and continue.
Had we had crampons and ice axe; we most certainly would have continued to Ingebjørgfjellet (passing Oksatjorni) which is signposted from the summit (5.4km away). The route is not marked, so, you need map and compass or a GPS. I use the ‘Footpath’ app on my iPhone which works excellently. Maps.me and ViewRanger are others to consider.
The return to the car is via the way you came, unfortunately, due to road access and a lack of public transport there is no other option. As an alternative, it is possible to climb Oksen from Hamre, however, you need to use a different road to access this area. The route up goes via Seljesete and Seljenuten.
The route is considered demanding with a time allowance of 7-hours. As mentioned previously, with good fitness and mountain experience it is perfectly feasible to do the route in under 3-hours even with plenty of photos.
We concluded our trip with a detour travelling back to Oslo. The weather was perfect, and we were not eager to return home when another night camping was possible. We called at Vøringfossen (here) which is an impressive waterfall towering 182m high.
We then continued to Ringericke and climbed up the Mørkonga gully to then camp high next to a lake for a final night.
RECOMMENDATIONS
Never underestimate the mountains and the environment in which you are exploring. June in particular is the start of the hiking season and as such, snow can be a factor on all of the above routes. This adds an additional potential for injury and problems. Particularly as the snow is melting and this can create snow holes, snow bridges and crevices. Do not take any risks and follow established routes and existing footprints.
Make sure you call in the Tourist Office in Kinsarvik and discuss your route options and take advice on current conditions and dangers.
It may be 30deg next to the fjord and glorious sunshine, but at the summit, it can be below zero, blowing a gale and torrential rain. You must take personal responsibility and be prepared for all conditions. At a minimum please take:
Suitable pack
Hat
Gloves
Warm insulated layer
Warm trousers
Waterproof jacket/ pants
Food for the duration of the hike and some contingency
1,5 ltrs of water (which can be replenished on all the routes via streams/ waterfalls)
Take water purification tablets as a just in case and consider a water purifier such as MSR TrailShot (here)
Map/ Compass
Charged mobile phone with a suitable App such as ‘Footpath’ (here)
Cash/ Card
Garmin InReach or similar
Plan your routes, be realistic on timings and always start early. One of the huge advantages of outdoor activity in Norway is daylight. In June, it is light at 0300 and goes dark after 2200 hrs.
CONCLUSION
Hardanger is a paradise.
Quite simply, if you do the route options above, not only will you see some of the most amazing views ever, you will be rewarded with wonderful challenging days that will provide you with a lifetime of memories.
Weather, as always, is key. We chose our weather window and traveled to the area knowing that we would be rewarded with great conditions.
Of course, if you are making a special trip to the area, you will need to take the weather you are given. Although it is great to have a plan, be prepared for that plan to change based on weather conditions and personal safety. We were desperate to travel to Ingebjørgfjellet after Oksen summit but made a sensible call and retreated.
The mountains and trails are going nowhere, always remember this!
The routes provided are achievable for all with enough allocated time based on individual experience and fitness.
Due to Covid-19, we experienced considerably quieter trails. On many occasions we were completely alone. Having spoken with locals and others, this is not normal! So, be prepared for more people when you venture to this area, especially Trolltunga.
For us, camping enhances the experience and brings you closer to the nature and environment. However, this is campervan heaven, and should you need a hotel, many are available.
Needless to say, we have picked highlights of the area and there is more to explore, but that will be another article!
This area would be fantastic for a Fastpacking trip, read here about equipment.
I am fortunate to have travelled the world, experienced mountains, summits and trails in iconic locations. Norway may not have any peaks/ summits that can compete with the Alps, Pyrenees or the Himalayas, but what it does have is the most incredible views.
I can honestly say, our mini trip to Hardanger is one of the most rewarding ever!
Special thanks to Abelone Lyng who was my partner in crime. Abe is the ‘muse’ in all the photos, the girl with a big smile and yes, these trails would have been a little less magic without her to enjoy the journey. She was also the inspiration for the trip and it is thanks to her we visited these amazing places.
Please support this website. I believe everyone deserves to read quality, independent and factual articles – that’s why this website is open to all. Free press has never been so vital. I hope I can keep providing independent articles with your help. Any contribution, however big or small, is so valuable to help finance regular content. Please support me on Patreon HERE.
I have used Scarpa shoes and boots in the past and have always been impressed with the mountain pedigree the brand has. So, I was very welcome to receive the SPIN and the SPIN ULTRA for testing.
The SPIN, in the words of Scarpa say, ‘… with more cushion and protection than the Atom, but a lighter, lower-profile design than the Neutron, the new Spin is the Goldilocks of our Alpine Running collection, for those who want both support and simplicity on rugged trails and craggy ridge lines.’
I will discuss and write about the SPIN ULTRA at a later date.
The SPIN is noticeably light (252g for EU42) and flexible. From the first look one can immediately see that this is a race or fast training shoe designed for a mountain environment. For sure, it’s a trail shoe, but I would extend that to be a mountain/ alpine shoe. It has ‘skyrunning’ written all over it and certainly from initial outings it immediately felt like VK’s and SkyRace (sub 42km) terrain would sit perfectly in the SPIN list of ‘go to’ uses.
The upper is mesh and therefore very breathable, structure and support of the upper comes from welded PU overlay. One of the plus sides of this, as in other shoes using this method, there are no seams that can cause irritation or rubbing inside the shoe.
The lacing is substantial with 5 sets of eyelets and the additional 6th eyelet should you wish to lace-lock. With a comfortable and padded auto fit tongue which extends slightly higher than other shoes I have tested, this is perfect for stopping any discomfort where the top of one’s foot joins the lower leg. There is a ‘lace-garage’ which is so obviously great, I have never understood why all run shoes do not use this method, or at least something similar.
The heel is padded and plush and really holds the foot with comfort and security. Very noticeable when running or hiking uphill is the hold the shoe gives; it is very reassuring.
It has a ‘sock-like’ fit (SOCK-FITLW by Scarpa) which is just perfect as it provides a wonderful, secure and comfy hold of the foot.
The toe box is well shaped, allows for toe splay but the SPIN is more of a ‘precision’ shoe designed for technical trail and as such it has a narrower fit but not very narrow. Certainly, if you need or require a wide toe box, the SPIN is unlikely to be for you, but you should try it… It has a toe bumper which provides some protection from contact with rocks or debris.
With a 4mm drop one needs to be a more efficient runner. It’s a shoe with cushioning (24mm/20mm) but not excessively so, hence I see that is a shorter/ mid-distance shoe. The midsole is EVA and I would say is on the firmer side, but after several runs one can feel it soften without compromising the shoe. It has a rock-plate, and this works really well offering great protection via a H-EVA Plate.
The outsole is Vibram which is known throughout the world. MegaGrip is extremely popular and although aggressive, it is not extremely aggressive. It can handle mud but not really sloppy stuff. Then again, very little shoes can do well at everything. If running in lots of mud, there would be better outsoles than this. But the MegaGrip is perfect for the SPIN intentions – mountains, ridges, trails, rocks in wet or dry conditions. The lugs are 4mm and quite spaced out. Grip is very good on a wide variety of surfaces, but it works best on rock, ridges, loose gravel and soft ground. You will see the the SPIN has cut outs in the sole and here you can clearly see the rock-plate. The cut aways help reduce weight and increase the flexibility of the shoe. This is noticeable, especially in the propulsive phase.
The SPIN comes with two foot beds. One minimalist and the other providing more cushioning and structure. This is a great idea! I personally used the more structured foot bed which secured the rear of my foot more. Switching between the foot bed really changes the feel of the shoe, so, if you prefer something more minimal. You will prefer the thinner of the two.
Sizing is true to size, I use an EU44 and these fitted as expected.
IN USE
The SPIN has great comfort and the sock-like fit is just perfect. The lacing system is superb at holding the foot and it is easy to adjust should you need. For example, I have a high instep, so I like to loosen my laces but not at the compromise of a secure foot hold. The addition of the the 6th eyelet allows for different lacing options; I didn’t need to lock lace as the foothold form the SPIN is so good. The lace garage is perfect for getting laces out of the way. One of the revelations is the heel area. It’s plush, extremely comfortable and is arguably the best hold I have had from any shoe. Climbing there is no movement or slipping.
The upper is very breathable and my feet were comfy in either wet conditions or hot conditions. Drainage is good. The welded overlay is adequate and provides good stability. Toe bumper could be better, but it is a minor complaint.
On technical trail, foot roll is minimal, but the SPIN does have a wasp like (figure of 8) shape and so depending on your foot shape, you could have some roll? I had no roll at all. I got no issues with the SPIN rubbing my ankles, a problem I have had with other shoes on technical terrain, this is a real plus!
Cushioning is on the harder side and lacks life and bounce but that is compensated for with great flex, especially in the propulsive phase. Also, you have two foot bed options and the more padded/ supported option was a real boost for me. They are very comfortable shoes.
The MegaGrip outsole works really well on a whole mix of terrain, wet or dry. But it works best on soft-ground, rocks and technical trail. Protection is very good but occasionally, you may find a stone getting in one of the gaps in the cutaways of the sole. It will not stay there, but if it is sharper, you may just feel it through the rock-plate.
CONCLUSION
I have been using Scarpa for many years, the Charmoz a personal favourite. But I have never used a run shoe from the brand. The SPIN has been a revelation and certainly for runs up to 4-hours on technical/ mountainous routes, it’s a shoe I will use time and time again. The overall package is excellent combing lightweight, responsiveness, feel for the ground, cushioning, great comfort and excellent grip in most scenarios. It’s a shoe for faster training or racing in the mountains.
Highlights come from excellent lacing, the sock-like fit, the shoes weight and the heel box.
There is little not to like in the SPIN. It is more of a precision shoe, but the fit is not as narrow as others, so, you would need to try them on to find out if they would work for you.
The only negative, for me, is the cushioning is a little hard and lacks a little life. It is a minor point and actually does not impair how the shoe performs, however, for some, it may influence how enjoyable the SPIN is to wear.
Specs:
4mm drop
252g for EU42
Upper Mesh w/ welded PU overlay
Insole H-EVA Plate
Midsole EVA-CM
Outsole Vibram Fixion/ MegaGrip
Cushioning 24mm/20mm
Sock like fit
Lace storage
Medium cushioning and protection
Choice of insoles
Please support this website. I believe everyone deserves to read quality, independent and factual articles – that’s why this website is open to all. Free press has never been so vital. I hope I can keep providing independent articles with your help. Any contribution, however big or small, is so valuable to help finance regular content. Please support me on Patreon HERE.
Episode 189 – We talk to Marcus Scotney about coaching, lockdown and preparing for MDS. Elisabeth Borgersen talks climbing Everest, albeit virtually and we speak with Mariano Alvarez about Spartan Trail.
*****
Talk Ultra is now on Tunein – just another way to make the show available for those who prefer not to use iTunes – HERE You can download the Tunein APP HERE
Talk Ultra needs your help!
We have set up a Patreon page and we are offering some great benefits for Patrons… you can even join us on the show! This is the easiest way to support Talk Ultra and help us continue to create!
Many thanks to our Patrons who have helped via PATREON
Please support Talk Ultra by becoming a Patron at www.patreon.com/talkultra and THANKS to all our Patrons who support us. Rand Haley and Simon Darmody get a mention on the show here for ‘Becoming 100k Runners’ with a high-tier Patronage.
Runner’s and particularly ultra-runners have this wonderful ability to cover distance under their own power with very little needs or requirements. Some water, some food, a warm jacket and waterproofs and adventure awaits.
However, you can only go so far without the eventual need to return home.
Fastpacking manages to encompass the world of backpacking and running to create a different adventure, fast and light! Backpackers tend to carry a plethora of equipment and move at a slower pace, happy to adventure for days and weeks at a leisurely pace.
Fastpackers, arguably are runners or hikers looking for the need to travel for multiple day’s but still cover good distances and not be excessively slowed down by weight and excess equipment. The crux though is often the balance of weight and one’s ability to still run/ fast hike.
“Fastpacking isn’t for every outing though. Sometimes you want to take it easy, set up camp, and enjoy a particular area. That’s when backpacking shines. Sometimes you just want to crush through a workout. That’s when you want to go for a really fast run.” Says Simoni, adding that he opts for Fastpacking, “when I want to tag multiple mountain summits in an area at one time, without needing to take multiple trips. If you’re squeezed for time, Fastpacking can really help maximize an adventure. I find it very rewarding to cover so much distance with minimal gear.” – Justin Simioni via La Sportiva
One could arguably say that races like Marathon des Sables, which is 35-years old in 2020, have paved the way for Fastpacking bringing a ‘fast and light’ scenario to a race format allowing participants to cover 250km’s in a self-sufficient manner.
However, Fastpacking has been around for many, many years. Long before MDS, and long before the term Fastpacking. But in recent years, the sport has developed into something else, no doubt boosted by the growth and popularities of FKT’s and lighter, more functional equipment.
It’s important to clarify, that Fastpacking is what you make it. Personally, I enjoy a lighter pack, moving fast (but not running) and being self-sufficient. This allows me to carry a little more weight, travel for longer, enjoy the process and still cover over a marathon per day. You though may prefer to be more minimalist, look at micro/ mini adventures of 2-4 days and aim to run for much of the way. There are no rules to the speed or distance you go.
It’s also important to consider many other factors that come into place:
Location and environment – There is a big difference to Fastpacking in Nepal to say the Alps.
Time of year – Winter conditions require more equipment and more specific equipment.
Weather conditions – Check weather and be prepared.
Access to water – Streams, rivers and lakes
Access to external help – If you are going remote, be responsible and plan accordingly.
It’s easy to see from the above, there is no one definitive kit list, but there are crossovers that apply to both.
Route Plan
Plan the route in advance, understand the terrain and understand what possibilities exist to obtain water. Importantly, carry a system that will ensure that you can drink water that is available from any source. Work out how long a planned route will take and then plan for contingency should something go wrong. Note that vertical ascent, descent and technical terrain will require moving slower. It’s not unusual to sometimes only cover 2km’s in 1-hour. Make sure you inform family or a friend of your planned trip, start day and end day. That way you have a backup and someone checking out for you. It may sound alarmist, but should something happen, you may well not be able to call for help. Contact and research with local authorities and ascertain current conditions on the trails and be aware of any restrictions.
Do you need a 12-week and/ or 24-week Multi-Day Training Plan perfect for a multi-day adventure or a race like Marathon des Sables? They are designed to provide you with a structured weekly plan culminating in a target event.
View a sample week HEREfrom the 12-week plan. Purchase HERE. (£14.50 pw)
View a sample week HERE from the 24-week plan. Purchase HERE. (£12 pw)
The Pack
Typically, a Fastpacker will look for something between 20 and 40 liters. For summer and short adventures, it is possible to go lighter and smaller. In winter, one will need more equipment that is often heavier and bulkier. Quite simply, the heavier the pack, the harder it is to run. So, if the plan is to run as much as possible, you need to go as minimal as possible whilst keeping safe. Make sure when testing and trying a pack that you add weight and understand how it feels when moving. Many brands are now producing packs specifically for Fastpacking. Personally, I like my pack to have a waist belt as this helps distribute the load and make the pack more secure. I would say that a minimum pack weight will be 6.5kg (14.3lbs) with water. Where possible, you would not want a pack to exceed 10kg (22lbs).
On a personal level, I would always go with a tent as I personally feel that it will offer more flexibility, especially if one shops in a clever way. My go to tent is an MSR Hubba Hubba NX (1/ 2 and 3 person versions available).
Things to look for in a tent:
Weight
Flexibility
How many season use?
Space
For example, the above MSR is a free-standing tent, so, it can be pitched inner only. If you know you are Fastpacking in ‘guaranteed’ good warm weather, you could travel without the fly sheet and basically sleep in a lightweight and bug proof shelter. Equally, if you know that you are fast packing in a bug free (mosquito) environment, you could leave the inner at home and just travel with the flysheet. This then provides a secure waterproof shelter, and, in this scenario, it acts just like a tarp but with more protection.
Tarps offer a light solution that can be used with trekking poles and if one is going very minimal and fast, they provide a very simple answer for overnight protection. It all comes down to comfort and what one is prepared to accept as ‘comfort’ whilst Fastpacking. Big Agnes make the Onyx which comes in at under 200g. A Tarp is a compromise if you will have bugs such as mosquitos whilst on your adventure.
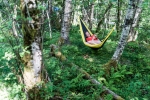
Hammocks are also an option providing one has trees to secure against. But if you add a bug net and tarp, in my opinion, a tent is a much better option. But a hammock can be a great addition to any Fastpacking kit, I use an Amazonas (here)
Sleeping Bag
A sleeping bag is essential for any adventure but firstly you need to ask some very specific questions before purchasing. I would say that ideally, one potentially could need several sleeping bags based on time of year and weather conditions. Remember, that any sleeping bag can be made warmer with layers. Add a hat, gloves and down jacket, suddenly the sleeping bag is considerably warmer.
Down is by far the lightest and smallest packing size, however, down cannot get wet! So, if you think you will encounter damp and wet conditions, you should consider a bag with a synthetic filling. Weight and pack size are important and with sleeping bags, the more you pay, usually, the lighter and smaller it will be.
Be careful on the ‘comfort’ rating of the sleeping bag.
Upper limit – the highest temperature the average male can expect to have a comfortable night’s sleep at without too much sweating.
*Comfort – the temperature at which the average adult woman can expect to have a comfortable sleep. *This is the ideal for most people choosing
Lower limit – the temperature at which the average adult male can expect to have a good night’s sleep in a curled position.
Extreme – the lowest temperature at which the average adult woman can survive. This rating comes with caution and additional consideration should be given if you plan to sleep in temperatures this low.
Recommendations:
PHD – Make sleeping bags and jackets to order, I am a long time fan here
Yeti – Passion One and Passion Three are a good start point here
Rab – The new Mythic Ultra is a personal favourite, available in 180 and 360 here
OMM -The Mountain Raid 160 is a great bag if you need synthetic filling here
Sea to Summit – The ‘Spark’ range have been getting rave reviews here
The minimalist Fastpacker will go with no matt or a very simple and small pad that provides just enough coverage for one’s hip if sleeping on one’s side. Personally, a good night’s sleep is essential, and a good/ light matt is an essential element to a fast and light kit.
Also, one should consider that in winter/ snow conditions, a matt will be essential for insulation.
Another consideration is potential problems from a puncture. Many inflatable matts become super light by using extremely light material. Be careful when using and make sure any potential sharp objects are removed before sitting or sleeping!
Matts very considerably but a personal favourite is the Klymit V Ultralite slim which offers full length body comfort all for 316g. It also packs very small. There are lighter matts and I list them below:
Thermarest NeoAir Uberlite 158g
Klymit Inertia X 258g
Nemo Insulated Short 278g
Sea to Summit Ultralight 294g
Exped AirMat HL 304g
Ultimately, the matt you choose may come down to a tradeoff between price/ packing size and weight. Be careful, some matts can be noisy when you move. Ok of going solo but really irritating if you are in close proximity of someone else.
Cooking System
For me, the MSR PocketRocket Deluxe (here) or 2 (here) kit is perfect. It has all one needs in a very small pack size and weight. I use the PocketRocket 2 kit that allows me to place a gas canister inside the 278g kit + a 4oz canister.
Another consideration would be JETBOIL Micromo Cooking System (here) which is the lightest system they do and if you just need to boil water, this is perfect!
Food
Dehydrated food is probably the most obvious option here and there are many varieties on the market. They are a one-stop option that requires water to hydrate and if you wish to be extremely minimal, some options exist that do not require hot or boiling water. A personal favourite is Lyo (here) and Real Turmat (here) – It may sound crazy but they both make foods that I would consider eating when not fast packing. They also do Vegan and Vegetarian options.
Check out Chicken Tikka Masala, Nettle Curry, Penne alla Bolognese and if Vegan, Organic Chilli and Barley Risotto. Breakfasts such as Mexican Scrambled Eggs and Organic Millet Porridge.
For any adventure, I work on a breakfast and a dinner and then carry snacks for during the day, this can be energy bars or if on a long Fastpack, I will even consider carrying another main dehydrated meal. Typical weights are 132g with approx 600 cals.
For me, Fastpacking is fun and adventure. I am not looking for FKT’s and therefore I do allow myself one or two luxuries. Coffee for me is an essential part of any trip and I mean good coffee. I could just take some coffee sachets and have a combined weight of grams.
No! For me, I take fresh ground coffee in a sealed tub and I use one of two coffee presses.
The Espro is my favourite as it acts as a flask/ drinking canister too. But it does come at a weight and size cost.
I fully appreciate that if going fast and light, the above is a complete no, no! But for me, that smell of fresh coffee each morning is worth it.
Water
You are going to be self-sufficient for multiple days, so, you need to find water and plan to obtain water from the route you will take. You can use purification tablets, I take the MSR TrailShot pocket sized filter (here) which meets U.S. EPA drinking water standards* and NSF protocol P231 for removal of bacteria (99.9999%), protozoa (99.9%), and particulates.
Clothing
Clothing requirements depend on the time of the year, the weather you will encounter and the duration of the Fastpack. Needless to say, one has to accept that changing clothes, taking a shower and feeling wonderfully fresh daily is not what Fastpacking is about. Layering clothing is essential to allow for fluctuations in temperature. Do your research, check weather forecasts and plan accordingly. The above photo is my equipment for a Fastpack in Nepal. Make sure you have a ‘Drybag’ to make sure all contents of the pack are protected from the weather, Sea to Summit (here) for example.
A good start point is as follows:
Short sleeve T
Long sleeve shirt
Shorts
Underwear x2?
Socks x2?
Hat with peak
Warm hat
Gloves
Merino base layer, top and bottom – I use Icebreaker here
Lightweight waterproof jacket – I use RAB Charge here
Lightweight down/ Primaloft jacket – I use RAB Kaon here
Buff
Bivvy bag
The above, for most, would be a start point and based on where and when Fastpacking, you could maybe add or takeaway certain items.
If going to more extreme and cold environments, the demand on clothing and what one takes will increase. I wrote an article on Fastpacking in Nepal (here) and this is a worthwhile read. Please note in Nepal, one can use tea rooms, so, one saves on tent/ tarp weight immediately if required.
Tracker/ Beacon
I use a Garmin InReach Mini (here) and it is superb. Small, light, has SOS button and allows for 2-way messaging anywhere in the world. I do not go on any adventure without it now. In conjunction with a mobile phone and associated App, functions become easier to use. Subscription services can be changed monthly and therefore one can add or takeaway facilities as required.
Another option to consider is a SPOT device.
Essential Extras:
Water purification
Toilet paper/ wet wipes
Hand sanitizer
First-aid kit
Sunscreen
Bug repellent
Headlamp and batteries
Lighter/ matches
Whistle
Map
Compass
Earphones
Optional Extras:
Trekking poles – to be honest, for most of my Fastpacks, poles are an essential and especially if one is using a Tarp or similar.
Battery pack for recharging.
Conclusion
Fastpacking for me, is one of the most pleasurable ways to travel by foot. The ability to cover distance, usually in a point-to-point way under ones own power and being self-sufficient is extremely rewarding. You can move as fast or as slow as you like, take as long as you wish and fully immerse yourself in the surroundings and environment.
Please support this website. I believe everyone deserves to read quality, independent and factual articles – that’s why this website is open to all. Free press has never been so vital. I hope I can keep providing independent articles with your help. Any contribution, however big or small, is so valuable to help finance regular content. Please support me on Patreon HERE.